Where Should I Install My Mini Split?
A ductless mini-split system is great for eliminating hot spots in your home and supplementing a central AC system. This type of system is also a good choice when adding an addition to your home, cooling a garage or shed or even cooling an entire home that doesn’t have a central HVAC system. No matter what your reasons for installing a mini-split system are, it’s important that you choose the right location for the indoor and outdoor components. In this article, we’ll explain what these different components are and what factors are most important when choosing to install each one.
Parts of a Ductless Mini-Split System
A ductless mini-split system consists of two primary components: the outdoor unit and the indoor air handler unit. On some systems, the outdoor unit is just a smaller version of a standard AC condenser. You can also opt for a system with an outdoor heat pump if you want it to be able to heat as well as cool.
The indoor air handler is connected to the outdoor unit by a conduit that contains the refrigerant lines and electrical wiring. This conduit runs through a hole in the exterior wall and then the air handler is mounted directly over the hole. The hole is also used to run the condensate so that the air handler can drain outside, which is important since water naturally forms inside the unit when it’s cooling.
A mini-split system can either have a single zone or multiple zones. Multi-zone systems typically have between two and eight air handlers that are all connected to the same outdoor condenser or heat pump.
Important Factors When Choosing Where to Install Your Mini-Split Air Handler
Choosing where in the room to install the mini-split air handler can sometimes be difficult. Some locations will always be better than others. If the air handler isn’t properly located, it can create a variety of issues that will make the system far less effective. As such, you should always consider all of the following factors when deciding where the air handler will go.
Height
A mini-split air handler can be recessed into the ceiling or mounted on the floor. Nonetheless, the system will always work far better when the unit is installed higher up on a wall. If the room has standard 8-foot or 9-foot ceilings, you’re best to install the air handler about 6 feet up from the floor. If the room has higher ceilings, you may want the unit to be slightly higher.
The reasons that height is important are to ensure the system cools effectively and has proper airflow. If the air handler is too high up, the ceiling will prevent it from properly circulating sufficient air and make it less effective. If the unit is too low, it will have more issues keeping the room sufficiently cool since it won’t be able to draw in all of the heat that naturally rises up to the ceiling.
If you have a heat pump system and you plan on using it for heating as much or more than you do for air conditioning, you usually want the air handler about halfway up the wall. A unit that is too high up on the wall will essentially only heat the air in the upper portion of the room and may struggle to keep the room sufficiently warm.
Wall Location
Which wall you choose to install the air handler on and the location on the wall also make a big difference for a few different reasons. A perimeter or exterior wall is always the best choice whenever possible. One reason is the cost and difficulty of the installation. When the air handler is mounted on a perimeter wall, it is much easier to install since the conduit can just be run directly outside.
If you were to install the unit on an interior wall, the refrigerant lines and wiring would need to be run inside the walls or above the ceiling. This usually means having to cut out sheetrock and then refinish everything once the unit is installed. An air handler that is mounted on an interior wall will also usually require a condensate pump to enable it to drain outside, which will further add to the installation cost.
If possible, you also want the air handler in the center of the wall and as close to the center of the room as you can. Having the unit centered on the wall is partly for aesthetic reasons and also to allow it to cool and possibly heat the entire room more effectively.
Choosing as central of a location in the room as possible will also allow it to condition the space more effectively. If the air handler is in the corner or at the far end of the room, it will struggle more and you will often end up with part of the room staying warmer or cooler. This is less of a factor for smaller spaces like a bedroom, but it can make a big difference for a larger room.
Heat Sources and Decor
Another thing to consider is that anything like shelves, cabinets, etc. can interfere with the air handler’s ability to properly circulate air and make it work less effectively. Ideally, you should also choose a location that isn’t near anything that gives off heat such as a large TV or a computer. This is mainly because any heat source will interfere with the unit’s thermostat and make it more difficult for it to correctly read the temperature in the room. This issue is also why you should try to choose a location that doesn’t receive direct sunlight and isn’t too close to any windows or exterior doors.
Accessibility
You should also make sure that you choose a location that makes the air handler easily accessible. This is merely to make it easier for a technician to service the unit and repair it as needed and also to make it easy for you to clean the unit’s air filter.
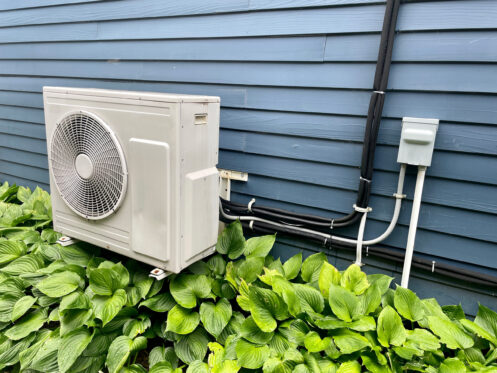
Choosing the Best Location for the Outdoor Unit
The best location for the outdoor part of a mini-split system depends largely on where the air handler or air handlers are located. Most systems can pump the refrigerant up to a maximum distance of around 150 feet. However, the efficiency of the system continually decreases the further the air handler is from the outdoor unit. If you’re installing a multi-zone system, you want to choose whatever location is most central and closest to all of the air handlers. For a single-zone system, it’s best to install the outdoor unit just outside wherever the air handler is located.
Most people choose to just mount the outdoor unit on the ground on a concrete or composite pad. You can also mount it on the side of the house or the roof if you don’t have sufficient space. Hanging the unit on the wall or putting it on the roof is also usually the better choice if the air handler is in a room on the upper floor. No matter which location you choose, you need to make sure that there is at least 2 to 3 feet of clearance around the unit. This is to make sure that it has sufficient airflow, which is important for enabling it to work as efficiently as possible.
One final thing to consider is that direct sunlight will make the unit less efficient. This means you should try to choose a shady location if possible or possibly consider putting an awning over it.
With more than 35 years of experience, Brennan Heating & Air Conditioning is the company to turn to for all of your cooling, heating, plumbing and electric needs. We serve customers in Seattle, Lynnwood and throughout the Puget Sound area and are ready to help if you want to install a mini-split or need any other HVAC service. To learn more about your options for mini-split installation or to schedule any home service, contact us today.